
FOOD
Zesty Shrimp with Fresh Mango Salsa Delight
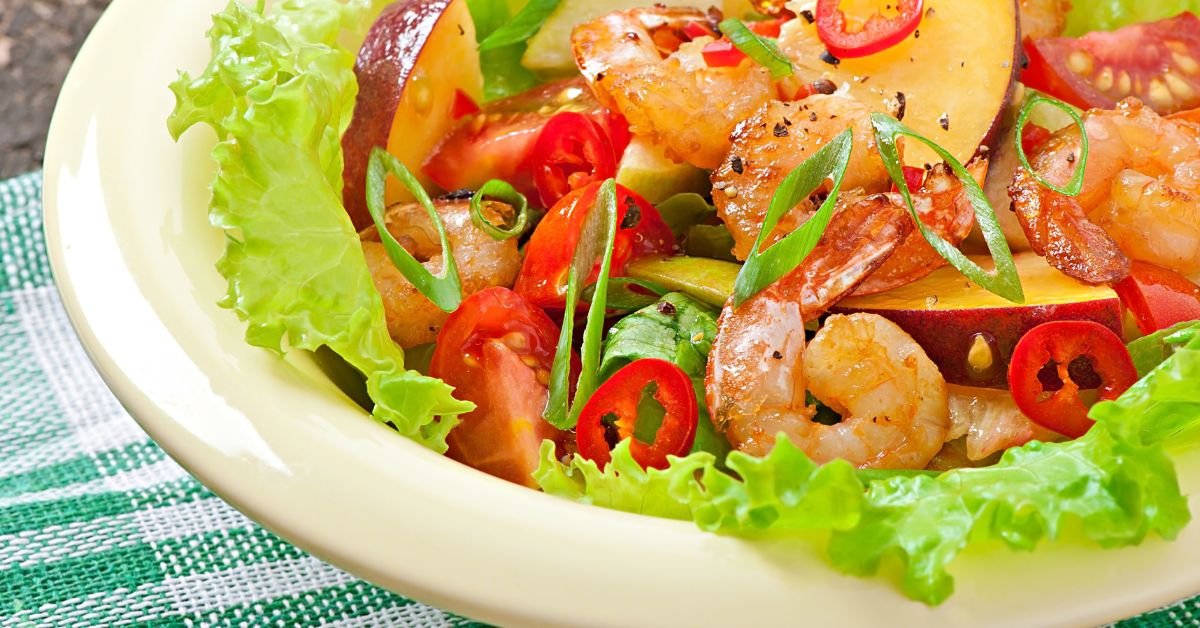
Shrimp with Fresh Mango Salsa is a dish that embodies sunshine on a plate. Whether you’re hosting a summer get-together, looking for a healthy weeknight dinner, or simply craving something with a kick of flavor, this meal checks every box. The juicy shrimp, infused with a hint of lime and garlic, pair perfectly with the colorful and tangy mango salsa, resulting in a dish that’s as refreshing as it is satisfying.
A Fusion of Flavors: Why It Works
The natural brininess of shrimp complements the brightness of tropical fruit, making mango an ideal partner. When paired with fresh cilantro, a squeeze of lime juice, diced red onion, and a touch of spice from jalapeños or chili flakes, the salsa brings a crisp contrast that enhances the shrimp’s savory profile. This dish doesn’t just taste amazing—it’s a celebration of textures and aromas, ideal for warm-weather dining or any occasion that calls for something light, yet bold.
What elevates this combination is its flexibility. Whether you grill the shrimp over a barbecue, pan-sear them in a cast iron skillet, or bake them in the oven, they hold up beautifully against the juicy crunch of the salsa. The mango salsa, too, is open to adaptation—add avocado for creaminess or bell peppers for extra crunch, and you’ll still enjoy a balance that hits every note on your palate.

Choosing the Right Ingredients
To make this dish shine, ingredient quality is key. Always go for fresh or flash-frozen shrimp—wild-caught varieties tend to offer better texture and flavor. Look for shrimp that are deveined and peeled to save prep time, but keep the tails on if you’re after an elegant presentation.
When it comes to the mango, aim for one that’s ripe but not mushy. A ripe mango should give slightly when pressed but maintain its shape when diced. Honey or Ataulfo mangoes are particularly prized for their silky texture and rich sweetness.
Fresh herbs like cilantro, and acidic elements like lime juice or a splash of white vinegar, not only brighten the salsa but also cut through the richness of the shrimp. Red onion adds a sharp crunch, while jalapeño or serrano chilies introduce a subtle heat that you can scale up or down depending on preference.
Cooking the Shrimp: Methods that Maximize Flavor
Grilling shrimp gives them a smoky char that pairs beautifully with fruit salsa, making this method ideal for outdoor meals. Simply marinate the shrimp for 10–15 minutes in olive oil, lime juice, minced garlic, chili powder, and a pinch of salt. Thread them onto skewers and grill over medium heat for 2–3 minutes per side until they’re opaque and slightly crisp on the edges.
Alternatively, pan-searing shrimp in a hot skillet with a bit of oil creates a gorgeous caramelization on the outside while preserving their tenderness inside. For a no-fuss approach, roasting shrimp in the oven at 400°F for about 6–8 minutes is another excellent method, especially when cooking in larger batches.
Whichever method you choose, don’t overcook the shrimp—this is a quick protein, and even a minute too long can make it rubbery.
How to Make the Perfect Mango Salsa
Crafting a memorable mango salsa is about balance. Start with diced ripe mango, add finely chopped red onion, freshly chopped cilantro, and minced chili for heat. Squeeze in fresh lime juice and season with a touch of salt and black pepper. Let the salsa rest for 10–15 minutes before serving so the flavors can meld.
If you’re feeling adventurous, introduce extras like diced avocado, corn kernels, or cucumber for a twist. These variations can make the dish more substantial or simply offer a fun change in texture. For an even more gourmet flair, consider roasting the mango or adding a splash of honey to enhance its natural sweetness.
Serving Suggestions for Maximum Impact
Shrimp with mango salsa is as versatile in presentation as it is in flavor. It makes an excellent topping for tacos, nestled in warm corn tortillas and garnished with shredded cabbage or pickled onions. You can serve it over a bed of coconut rice or quinoa for a hearty, balanced meal, or pair it with a crisp salad of arugula and baby greens for a light, low-carb option.
For a casual gathering, arrange the shrimp and salsa on a platter with tortilla chips and lime wedges for a festive appetizer. And if you’re planning a romantic dinner, a simple plating with grilled shrimp fanned out over a mound of mango salsa, accompanied by a glass of chilled white wine—like Sauvignon Blanc or a dry Riesling—elevates the meal to restaurant-quality elegance.
A Healthy, Guilt-Free Indulgence
Beyond its flavor, this dish shines in nutritional value. Shrimp is an excellent source of lean protein, low in calories, and rich in nutrients like selenium, vitamin B12, and iodine. Mangoes contribute vitamin C, antioxidants, and fiber, making the salsa not just delicious, but also heart-healthy.
The combination is naturally gluten-free, and if served without grains or tortillas, it’s also suitable for keto and paleo diets. Swapping in grilled tofu or tempeh for the shrimp offers a plant-based version that doesn’t skimp on taste or texture.

Frequently Asked Questions (FAQs)
Q1: Can I make mango salsa ahead of time?
Yes! You can prepare mango salsa a few hours ahead and store it in the refrigerator. In fact, letting it sit helps the flavors deepen, but it’s best consumed within 24–48 hours for freshness.
Q2: What’s the best way to cook shrimp for mango salsa?
Grilling, pan-searing, and roasting are all excellent methods. Each provides a different flavor profile, with grilling offering the smokiest result.
Q3: Is this dish suitable for meal prep?
Absolutely. You can pre-cook the shrimp and store them separately from the salsa. Just assemble when ready to eat to maintain texture and freshness.
Q4: Can I use frozen shrimp?
Yes. Thaw them under cold water or overnight in the fridge before cooking. Pat dry before seasoning to ensure even browning.
Q5: What other fruits pair well with shrimp besides mango?
Pineapple, peach, and papaya are great alternatives or additions to mango. They maintain the tropical theme while adding variety.
Q6: How do I keep the shrimp from becoming rubbery?
Avoid overcooking! Shrimp cook very quickly, usually in 2–3 minutes per side depending on size. Remove them from heat as soon as they turn pink and curl slightly.
Conclusion
Zesty shrimp with fresh mango salsa delight isn’t just a recipe—it’s a sensory experience that brings together color, taste, and aroma in perfect harmony. Ideal for everything from summer BBQs to elegant dinners, it’s a dish that’s both approachable and impressive
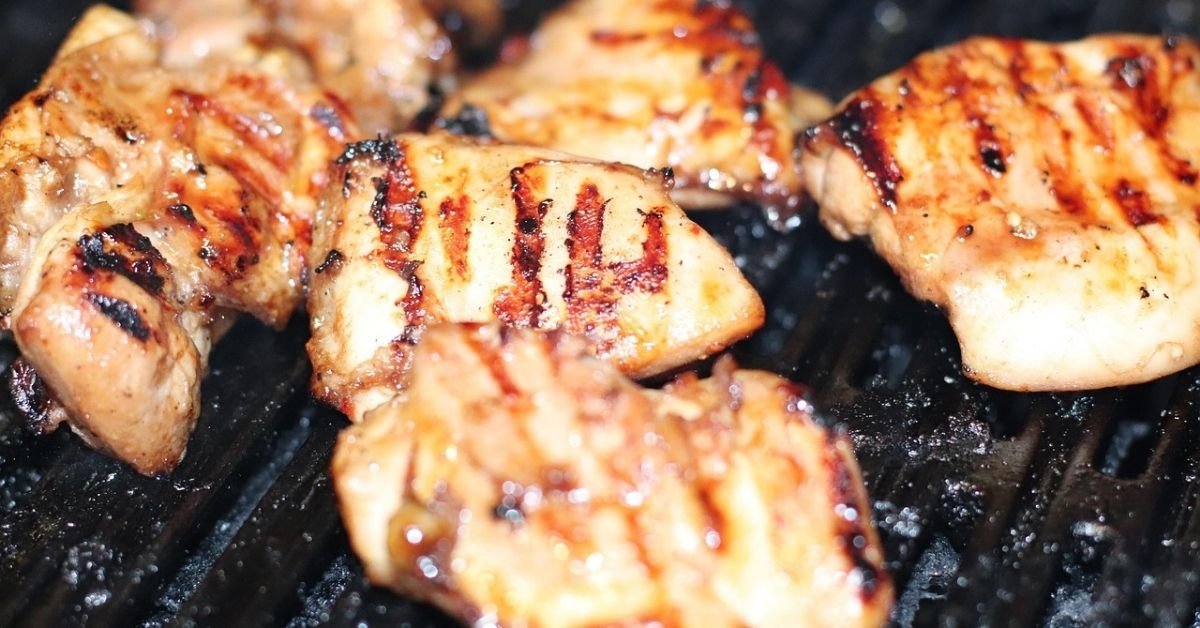
Grilling chicken breast can be a bit tricky, and one of the most common questions is: how long to grill chicken breast The answer depends on several factors, including the thickness of the breast, the heat of the grill, and the desired level of doneness.
Understanding the Basics of Grilling Chicken Breast
Before we dive into the specifics, it’s essential to understand the basics of grilling chicken breast. The key is to cook the chicken to a safe internal temperature while maintaining its juiciness and flavor. The recommended internal temperature for cooked chicken is 165°F (74°C).

Factors Affecting Grilling Time
Several factors can affect the grilling time of chicken breast, including:
- Thickness of the breast: Thicker breasts take longer to cook.
- Heat of the grill: Higher heat cooks the chicken faster, but can also lead to burning.
- Desired level of doneness: Some people prefer their chicken breast more well-done than others.
Tips for Grilling Chicken Breast to Perfection
To achieve perfectly grilled chicken breast, follow these tips:
- Preheat your grill to medium-high heat (around 375°F or 190°C).
- Season the chicken breast with your favorite spices and marinades.
- Grill the chicken breast for 5-7 minutes per side, or until it reaches the recommended internal temperature.
- Let the chicken rest for a few minutes before slicing and serving.
Real-Life Grilling Experiences
“I was skeptical about grilling chicken breast, but after following a few simple tips, I achieved perfectly cooked chicken every time. The key is to not overcook it!” This kind of feedback is common among grill enthusiasts, highlighting the importance of technique and attention to detail.
FAQs
Q: How long should I grill chicken breast at 400°F (200°C)?
A: Grilling chicken breast at 400°F (200°C) can take around 5-6 minutes per side, depending on the thickness of the breast.
Q: Can I grill frozen chicken breast?
A: It’s not recommended to grill frozen chicken breast, as it can lead to uneven cooking and food safety issues. Thaw the chicken breast before grilling.
Q: How can I prevent chicken breast from drying out on the grill?
A: To prevent chicken breast from drying out, make sure to not overcook it, and use a meat thermometer to check the internal temperature.
Q: Can I grill chicken breast with the bone in?
A: Yes, you can grill chicken breast with the bone in, but it may take longer to cook. Make sure to adjust the grilling time accordingly.
Conclusion
Grilling chicken breast can be a delicious and healthy way to prepare a meal, but it requires some finesse. By understanding the factors that affect grilling time and following a few simple tips, you can achieve perfectly cooked chicken breast every time.

Kittens have different nutritional needs than adult cats, requiring a diet rich in protein, fat, and other essential nutrients to support their rapid growth and development. Kitten food is formulated to meet these unique needs, but not all kitten food is created equal.
What to Look for in Kitten Food
When selecting a kitten food, look for a nutrient-rich formula that includes high-quality protein sources, such as chicken or salmon. Avoid fillers and by-products, and opt for a food that’s rich in omega-3 fatty acids to support skin and coat health.
Types of Kitten Food
There are several types of kitten food available, including dry food, wet food, and a combination of both. Dry food is convenient and helps maintain dental health, while wet food provides higher moisture content and can be more palatable.

Dry Kitten Food vs. Wet Kitten Food
Both dry and wet kitten food have their pros and cons. Dry food is often more affordable and has a longer shelf life, but may not be as appealing to kittens. Wet food, on the other hand, is more nutrient-dense and can be more appealing, but may be more expensive and have a shorter shelf life.
“I was overwhelmed by the number of kitten food options available, but after consulting with my vet, I found a great food that my kitten loves and thrives on.” – A satisfied kitten owner
Frequently Asked Questions
Q: How often should I feed my kitten?
A: Kittens typically require 3-4 meals per day until they’re about six months old. After that, you can gradually switch to twice a day.
Q: Can I switch my kitten’s food too quickly?
A: Yes, switching your kitten’s food too quickly can cause digestive upset. Gradually introduce new food over a period of 7-10 days to prevent this.
Q: What are the signs of a food allergy in kittens?
A: Common signs of a food allergy in kittens include itching, scratching, and digestive issues. If you suspect a food allergy, consult with your vet to determine the best course of action.
Q: How do I know if my kitten is getting the right nutrients?
A: Consult with your vet to determine the best kitten food for your kitten’s specific needs. They can help you choose a food that’s rich in essential nutrients and monitor your kitten’s health.
Conclusion
kitten food, it’s clear that choosing the right food for your kitten is a crucial decision. By understanding your kitten’s nutritional needs and consulting with your vet, you can make an informed decision and give your kitten the best possible start in life.
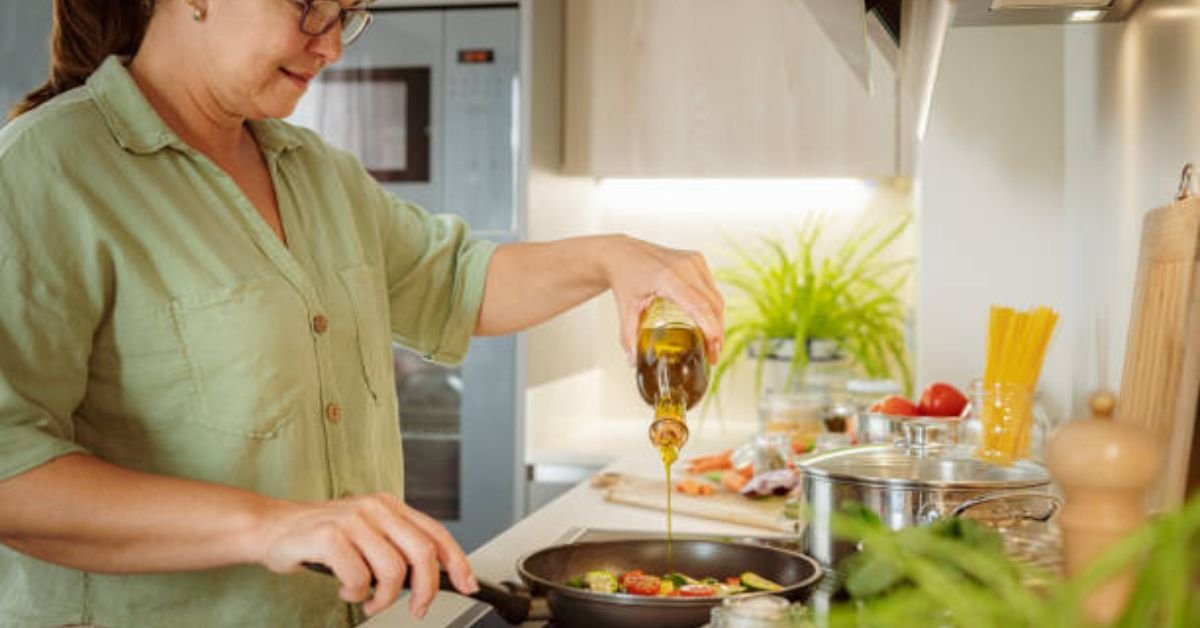
Olive oil for cooking, the type of oil you choose can greatly impact the flavor and nutritional value of your dishes. Extra virgin olive oil (EVOO) is often considered the gold standard, but it’s not always the best choice for high-heat cooking.
EVOO has a low smoke point, which means it can become damaged and lose its flavor when heated to high temperatures. For cooking methods like frying or sautéing, a more neutral-tasting olive oil with a higher smoke point may be a better option.
Choosing the Right Olive Oil for Cooking
So, how do you choose the right olive oil for cooking? Here are a few factors to consider:
- Smoke point: Look for olive oils with a higher smoke point, such as refined or light olive oil, for high-heat cooking.
- Flavor profile: Choose an olive oil that complements the flavors in your dish. For example, a mild olive oil is perfect for delicate fish, while a robust EVOO pairs well with hearty vegetables.
- Quality: Opt for high-quality olive oil from reputable producers to ensure the best flavor and nutritional benefits.
“I love using olive oil for cooking because it adds a richness and depth to my dishes that other oils just can’t match,” said a home cook.

The Benefits of Using Olive Oil for Cooking
Using olive oil for cooking offers numerous benefits, including:
- Health benefits: Olive oil is rich in antioxidants and healthy fats, making it a great choice for heart health.
- Flavor: Olive oil adds a distinct, rich flavor to dishes that can elevate even the simplest recipes.
- Versatility: Olive oil can be used for a variety of cooking methods, from sautéing to roasting.
FAQs
Q: Is olive oil good for cooking?
A: Yes, olive oil for cooking is a great choice, but it’s essential to choose the right type of oil for your cooking method.
Q: What is the best olive oil for cooking?
A: The best olive oil for cooking depends on the cooking method and desired flavor profile. For high-heat cooking, a refined or light olive oil is a good option.
Q: Can I use extra virgin olive oil for cooking?
A: While EVOO is a great choice for low-heat cooking or as a finishing oil, it may not be the best option for high-heat cooking due to its low smoke point.
Q: How do I store olive oil to maintain its quality?
A: Store olive oil in a cool, dark place to preserve its flavor and nutritional benefits.
Conclusion
Olive oil for cooking, it’s clear that this versatile oil can elevate a wide range of dishes. Whether you’re a seasoned chef or a casual cook, incorporating high-quality olive oil into your cooking routine can have a significant impact on the flavor and nutritional value of your meals.
-

 TECH9 months ago
Apple iPhone 17: Official 2025 Release Date Revealed
-

 BLOG9 months ago
Understanding the ∴ Symbol in Math
-

 ENTERTAINMENT7 months ago
What Is SUV? A Family-Friendly Vehicle Explained
-

 EDUCATION4 weeks ago
Horizontal Translation: How to Shift Graphs
-

 EDUCATION9 months ago
Using the Quadratic Formula
-

 ENTERTAINMENT9 months ago
Going Live: How to Stream on TikTok from Your PC
-

 TECH9 months ago
Prodigy: Early Internet Pioneer
-

 EDUCATION9 months ago
The Meaning of an Open Circle in Math Explained